Learn These Useful Steps To Speed Up Your Windows 10 Computer
In today’s article, you will learn useful steps to speed up your windows 10 computer in minutes. And the best thing about this is that you can do it for free. So let’s begin with a series of steps.
Step 1. Uninstall Unwanted Programs
There is a lot of applications installed in our computer. But actually we don’t use them and those makes our computer slower.
So, to uninstall those unwanted computer programs follow instructions below:

- Go to start and search for control panel.
- Click on uninstall a program.
- And just uninstall all of those you don’t use much.
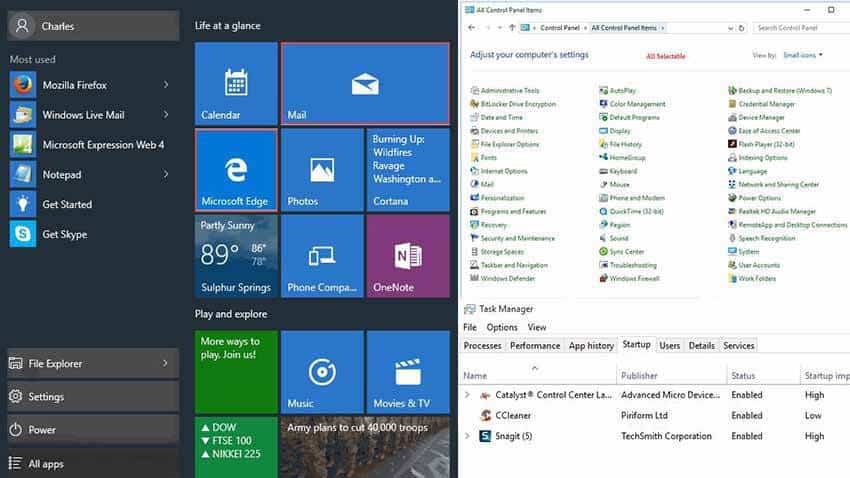
Step 2. Disable Unwanted Startup Programs
You may notice that whenever you turn on your computer, there are a lot of programs start off with your windows. Those make your PC slower and also your boot up process. So to disable those unwanted startup programs, follow the steps below:
- Right click on your taskbar.
- Click on task manager.
- Click on more details.
- Now select on startup.
So those are the programs which startup with your windows. So for you to disable those programs:
- Select on it and click on the disable button
- Do it with every program you want to disable.
- This will make your boot up faster than before
Step 3. Delete Unnecessary Temporary Files.
For you to do that, please be guided with the instructions below:
- Go to the run dialog box and type “temp”
- And click on OK
- Now delete all the files as possible.
- Don’t worry, it will not delete any necessary files.
- And now close the window.
- Open the run dialog box again.
- Type %temp% and click on OK.
- And again delete all the temp files.
- Close the window
- Open the run dialog box and type “prefetch”.
- Click okay and continue.
- And also delete all the files
Step 4. Use Disk Cleanup
By using Windows for a long time, a lot of system junks added in your PC and those make our computer system slower. So for you to clean it follow the detailed instructions below:
- Go to this PC icon which is located in your desktop.
- And right-click on your local disk C.
- Go to properties and click on disk cleanup.
- Now this scan will take few seconds and after that click on clean up system files.
- Now this will take another scan. After that you will see those system junks it found.
- For you to delete those, click on ok and delete files.
- And this will delete all the system junks.
Step 5. Power option
- Go to your start menu and search for power options.
- Just open it and there you can see your computer power plan.
- The default windows power plan is balanced.
- So change it to high-performance and close the power option window.
This will help your computer to push your PC performance by giving it more power.
Step 6. Optimize drives
So, for you to optimize your computer drive, just go ahead and follow instructions below:
- Go to PC again.
- Right click on the local disk
- go to properties
- And go to Tools
- Now click on optimize
- Select your local disk and click on optimize
- Now this will take few minutes
- After it is completed your PC will definitely be optimized.
Step 7. Delete junk files
Now you might be thinking that, if we run the disk cleanup so why need to delete junk files again. But the disk cleanup is not that strong and it was just delete system junk and not every program’s junk.
So for you to be able to do it, you need a 3rd party software. Here you can use CCleaner or clean master. On my end, I do use the clean master. So if you have clean master installed in your computer, just open it and run a scan and delete all the junks.
Step 8. Visual effects
This setting will change your Windows 10 graphics settings. After you do some steps I’m going to teach you on this setting, your windows graphics will not be similar again. But don’t worry, because it will not change your gaming graphics or program graphics.
It will just disable your mouse shadows, thumbnail previews, smooth edges, smooth screen fonts. Just stuffs like those, we don’t even look at them, but it will update the performance to the maximum level.
So the last decision is totally on you. But if you don’t like it you can change it always. So I will suggest you for just try it. So now let’s begin with some simple instructions you can follow.
- For you to do it, click on your start menu
- And search for system and open it.
- Now once you are on the page click on advanced system setting.
- Now click on the settings button.
- There the default visual effect is on for ADJUST FOR BEST APPEARANCE.
- Now change it to ADJUST FOR BEST PERFORMANCE.
- Now click on OK.
- Now exit the window.
After you have done these instructions I mentioned, you could feel disappointing. But you can change it whenever you want. After you complete all of those steps just give your computer a restart for it to refresh itself and I am sure that you will get an amazing result.
ALSO READ:
- 7 Most Interesting Internet Tricks You Didn’t Know About
- Six Useful Internet Tricks You Need To Know By Now
Now after following all instructions I’ve given in this article complete, if your computer will not speed up, then there might be a chance that your computer has a virus or malware. If this is your situation, then you might also need to use a good anti-virus software.
And there you have it all about useful steps to speed up your windows 10 computer to the max. If you like this article, please share this with your friends and other people whom you might think are ones who need this guide.
Also please leave a comment right down below if you have any additional idea about optimizing and speeding up windows 10 computers.